
MyGrafico is having a big Memorial Day sale! 30% off on all products, so don't forget to stop by Lindsay’s Stamp Stuff at MyGrafico to save 30% off storewide!


 The white flower is made from layers of white shimmer paper, vellum, and cardstock, and layered on top of a white doily that has been sprayed with various shades of Shimmerz: Ruby, Mango Madness, and Bed Of Roses. I attached all of the layers together by sewing a button in the center.
 The purple flowers were cut with my Cricut out of various scraps of purple cardstock, and the centers are a scallop circle punch by Martha Stewart, with some purple gems I got on clearance at Hobby Lobby. After making the purple flowers, I spritzed them and the lace ( which was originally cream colored) with Rock-A-Fella Blue Shimmerz (kind of a purple-y blueberry color).
  The diecut title was cut with my Cricut and Once Upon A Princess cartridge, and embellished with Stickles. Thanks for looking, wish me luck!


 1. Pink- I crumpled a bunch of white paper doilies and sprayed with Glimmer Mist and Shimmerz of various pink shades, then waited until they were completely dry and smoothed them out carefully (they rip easily, so be careful!), and layered with a drop of hot glue in the center. Then, I took a wide pink satin ribbon (about 2 inches, I think), pinched it in half longways (did I just make up a word?), and secured the end of the ribbon to the center of the doily flower with a drop of hot glue. Then, just keep pinching, twisting, glueing, and wrapping around in a circle, until you are happy with the look of the flower. When you are finished, just tuck the end of the ribbon under the twisted ribbon flower.
 2.Blue- I had already joined this swap when Lindsay (Lindsay's Stamp Stuff) debuted her 3-d Flowers Svg Set, and I was SO excited, because I knew that it would be perfect to try for this swap. Instructions for assembling the flower are included with the purchase of the set. Before I assembled the flowers, I inked the edges with a light blue Bic Markit, then painted the flowers with Angel Wings Shimmerz. After they were dry, I assembled the flowers, shaped the petals with my fingers, and then put a drop of Martha Stewart Glue for glitter in the center of the flower, and sprinkled brown and black Doodlebug flocking.
 3. Yellow- for these flowers, I cut out this awesome freebie svg file from Svg Cuts, inked the edges of each layer (with Copics and Bic Markits-I love using markers to ink the edges of intricate cuts, it makes it easier to get into the little curves), rubbed the center layer of the flower on a glue pad, sprinkled with glitter, then sprayed a clear acrylic sealer on the layer. I glued the layers together with a quick drying glue, and curved and shaped the petals and flower centers with my fingers, and did a fine line of yellow Stickles around the center of the daffodils.
 4. Neutral (Black and Cream)-another one of Lindsay's Svg 3d Flower Files, I made these flowers with some yummy flocked paper by GCD Studios, shaped the petals with my fingers, and spritzed with Truffle and Treasured Hymn Shimmerz.
 5.Green- First, I printed out a sheet of olive Uptown Houndstooth paper from Lindsay's Stamp Stuff. I cut circles out of kraft cardstock, and the leaves using Plantain Schoolbook, scalloped circles of the Uptown Houndstooth using the Storybook cartridge, and the smaller scalloped circle is a Martha Stewart punch, and I inked and assembled, and added a rhinestone to the center.
 6. Red- I Love red poppies, so I attempted to make my own. I punched a 1 3/4 inch circle of dark brown cardstock, then attached LOTS of layers of punched red tissue paper scallop circles, and fluffed them out with my fingers. Then I punched a small scalloped circle out of the dark brown cardstock, then added dots of Martha Stewart glue for glitter, and dusted the centers with Martha Stewart Onyx and Brownstone glitter.
 Wow! My oldest, my little Catybug, is turning eleven on the 22nd! It just doesn't seem right! Anyway, when I saw the anniversary/birthday blog hop at Whimsie Doodles, I knew that this image would be perfect for her birthday card!


 The other roads were all torn up in places (the rushing water literally rearranged the asphalt), and sticks, trees, and other debris from the fields were washed into the roads:
 And there were other things that I have never seen before, such as the side of the road being washed away, so that the asphalt was not fully supported (see the small cracks on the edge?).
 And mini-water falls and "rapids" in the fields and roadside ditches:

 Which, of course, the girls decided to go wading in...


 Now head over to the rest of the DT's blogs for some scrappy goodness!


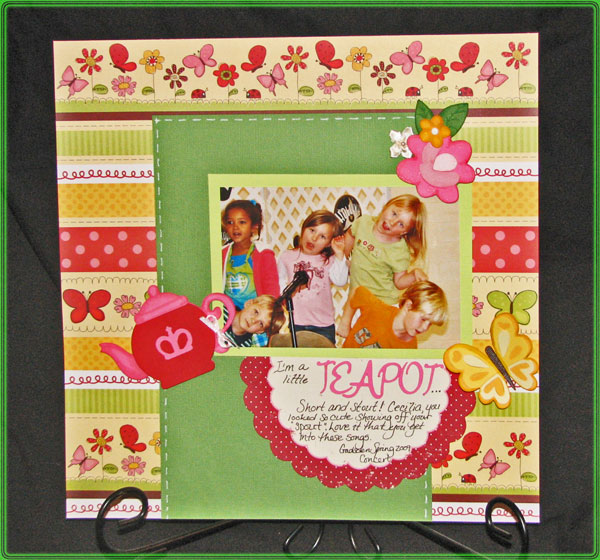 I put this layout together for a Design Team call over at Scrapbook Pal. I used some fantastic patterned paper (just love those colors!), and finally put that Once Upon a Princess Cricut cartridge to good use! The little teapot from p.61 was perfect for his layout, cut at 2 1/2 inches, along with the OUAP font for the word "teapot", cut at 1 inch, the butterfly on p.59, cut at 2 inches,and the flower from p.60, cut at 2 inches. The tiny yellow flower was cut from Plantain Schoolbook, p.76, at 3/4 inch. I shaded my die cuts with Copic markers and shimmery chalks from Pebbles Inc.