Sunday, September 30, 2012

A Scrappy Sunday, part # 3 (In Good Company and Glitter Girl Challenges)

And, for my last post of the evening, I have a couple of layouts to share that were inspired by this week's Glitter Girl (using a die-cut machine) and a friend and fellow counterfeiter's challenge, In Good Company (she challenged us to use Jenni Bowlin products-and I had a lot in my September kit!).
My first layout, "1st Day Of School":
 Supplies used for this layout:Jenni Bowlin patterned paper and stancil sheet, Studio Calico Rolodex patterned paper, Crate Paper journaling spot, Basic Grey Oxford chipboard books and stars, a handmade felt bow paper clip, black foam Thickers, a layered paper flower cut with Mother's Day Bouquet Cricut cart, a stamped and heat embossed kraft journaling spot, and Elle's Studio journaling spot, Studio Calico mini letter stickers, twill ribbon, and a notebook edge punch.

My second layout for these challenges, "Puppy Love":

This page uses yellow and gray, one of my current favorite color combos! The patterned paper is Jenni Bowlin Wren "Lace Curtain", Jillibean soup patterned paper, Studio Calico letter stickers, black foam Thickers, a layered paper flower cut with my Cricut Mother's Day Bouquet cart, handcut vellum feathers inspired by Jenni Bowlin studios, die-cut and punched pinked circles, Crate Paper journaling spot and "Sweet" tab, and Jenni Bowlin quilted Magpie stickers.
That rounds out my creative fun for today! Hopefully, I'll be able to play with my crafty goodies tomorrow, too. Thanks for dropping by my blog!

A Scrappy Sunday, Part #2

The second layout that I made and am sharing today is based on the September 16th sketch from The Studio Challenges:
Here is my layout, "Spinning":
Supplies used: Jillibean Soup Homemade 6 Bean Soup patterned paper. a handmade paper flower, washi tape, black foam Thickers, border punched strips, a stamped journaling spot on kraft, a Graphic 45 chipboard button tied with twine, a printed, layered spinner that I made last year and never used, a handmade felt bow paper clip, and some die cut doilies.


A Scrappy Sunday, Part #1

I had some free time and the house to myself today, so I had some time for scrappy fun! I worked on using up bits and pieces from previous counterfeit kits , and making pages for some challenges. Up first, a page that I made for sketch #227 over at Creative Scrappers.

The Sketch:
My Layout, Smile:
 
Papers used: B-sides from Simple Stories Summer Fresh, Pink Paislee Declaration, Pink Paislee London Market. I used a loopy border punch, Prima decorative tape, a Grungeboard flourish that I painted and heat embossed , hot pink Prima flowers, one Crate Paper journaling spot, woodgrain letter stickers from Momenta, and a layered flower from my September kit.
I'll be back with another layout in a few minutes!

Friday, September 28, 2012

CKCB Challenge #3

The Counterfeit Kit Challenge blog gave us one more challenge this month to help us use up our kits and stash. The last challenge of the month was this:

Challenge #3: Negative Space Challenge: Use the negative space from a punch or chipboard on your project.
I used my Cricut and Sure Cuts Alot program to die cut arrows from my cardstock, putting the patterned paper underneath so that it would show through the negative space. Here is my layout:

 I based this layout on sketch #226 from Creative Scrappers:

I cut the arrows and backed the cardstock with an ancient sheet of Tinkering Ink patterned paper from my stash. I also used various scraps of blue cardstock, some Mr.Huey's mist in Clay and Dark Calico, and from my CKCB kit-red and white polka dot washi tape, brown patterned paper from the 6x6 Jillibean Soup Homemade 6-Bean Soup pad, and Momenta letter tickers that I customized and printed out in a dark woodgrain print.
A closer look at the arrows:


Saturday, September 22, 2012

Chanelling My Inner Tim Gunn


We were given this challenge at the Counterfeit Kit Challenge blog:

Challenge #2: Character Inspiration: Pick your favorite character from books/movies/t.v. and let them inspire your project (style, color, type of project...).
And I immediately thought of Project Runway! I have loved that show since the beginning, and find it very inspiring (and a lot of fun to watch!) When I saw this challenge on the MME blog:

Welcome to our last September challenge! Today we are taking an idea from Project Runway. We want you to create a layout and then create a card that goes along with the layout.
In other words, your card must be clearly inspired by the layout. Whether you use the same design elements, or the same products...they must be a pair.
The name of this challenge? Make It Work. Yes. I'm channeling Tim Gunn. :)

I knew it was fate ;-) So, this is the Layout and Card combo that I made:
Supplies used: (From my Kit) stamped polka dot kraft envie, stamped white on kraft journaling spots, maroon handmade paper flower, stamps from My Mind's Eye Sweetest Thing collection, and from SwissGirl Designs, Tim Holtz/Sizzix embossing folders, and white paper doilies. From my stash: My Mind's Eye The Sweetest Thing: Lavendar patterned paper (12x12, and 6x6), layered embellies, chipboard stickers, brads, Enamel Dots, and crocheted doily.
 In keeping with the Project Runway theme, I used the stitch embossing, stamping,and doilies. I came up with a set that I quite like! (I have to practice the "Keep Calm" part daily with these two, lol!)
Thanks for looking!

Thursday, September 20, 2012

Autumn Love * A Layout Revamp*

Have you ever had a layout that just sticks in your mind after you've "finished" it? This was one of those layouts for me! I photographed it and put it away, but it still didn't "feel" finished to me. So I pulled it back out and went to work on it! Here is what it looked like before:

And here is what it looks like now that I fiddled with it a bit:


I like it much better, don't you?
What I did to change/fix it: The title and leaf die cuts just weren't "popping" the way I wanted them to. So, I inked the edges with Walnut Stain and Barn Door Distress inks, and backed them with red washi tape. I really wanted to tie it all together with the red, dark brown, and orange that I already had little touches of, so that is what I worked on next. I added some Jenni Bowlin vintage buttons in red and orange, tied them with brown and white baker's twine, and added a couple of little ruler border stickers that had the cream and dark brown.

My little printed tickets seemed just a little bit too pink to me, so I inked them a little more heavily with Barn Door and Walnut Stain Distress Inks...now, they are just the right color!
Just to balance all of the embellieshments and make the photo stand out a little bit more, I added a strip of golden yellow grosgrain ribbon to the right side of the photo, which I love, because it adds a lovely bit of texture.To finish it all off, I inked the edge of the whole layout with Walnut Stain.

So, what do you think? Do you like the newer version better? Did I improve it, or should I have left well enough alone?

Wednesday, September 19, 2012

My Crew *Inspired By Glitter Girl and Basic Grey*

I have been scrapping (or should I say hoarding) with Basic Grey for years now, and when I was working on organizing my scrapbook closet yesterday, I realized just how many unopened collection packs I have in my stash. So, I made up my mind to use some of it, and headed off into the blogosphere for inspiration! I stopped by the Basic Grey Blog and found this sketch:
I pulled out some papers and the sticker sheet from the BG What's Up collection, some scraps from my scrap bin, including a partial sheet from BG Nook&Pantry collection, a few matching partial pieces of cardstock, and then I headed over to Two Peas In a Bucket to procrastinate gather more inspiration. I found the newest Glitter Girl video, and decided to scrap along with Shimelle.

Here is the page that I ended up with:
And since this week's Glitter Girl is all about clustering embellies, here is a closer look at my clustered embellies:


Supplies used:
Paper and stickers from Basic Grey What's Up collection, lavendar,aqua, and dark grey cardstock, patterned paper from Basic Grey Nook and Pantry, stick on pearls, Martha Stewart and Fiskars punches, Studio Calico letter stickers, and American Crafts Thickers.

Tuesday, September 18, 2012

My Mind's Eye Challenge

When I saw the My Mind's Eye vendor challenge for this month over at Two Peas, I knew I had to grab some of The Sweetest Thing Collection from my new CHA Summer stash and play along!

I have this photo of my daughter that I have been holding onto, waiting for just the right papers and embellies to scrap it with, and I think this collection suits it perfectly!

Here is my layout:
 
A closer look at the die cut I used for the title (I added Enamel Dots, a chipboard sticker butterfly, and a glazed brad, all from the same collection):
 and the journaling spot (embellished with an Enamel Dot, a layered sticker, and a wooden button that I tied with pink baker's twine):
The journaling reads:
"Just one moment in time-a fun filled afternoon exploring downtown Nashville. You stopped chasing Evan and Cecilia, and smiled at me- and it took my breath away."

You can find My Mind's Eye The Sweetest Thing: Lavendar collection HERE at Two Peas.

Monday, September 17, 2012

Back 2 School with Jenni, Crate, and WASHI!

I have been soaking up lots of back 2 school inspiration from bloggers for the past few weeks, so I decided that I should take a swing at a back to school page myself! The Jenni Bowlin Studio inspiration blog has been inspiring me for a while now with lots of back to school pages, and I knew that this stencil paper was perfect for the theme! I tried the "washi tape behind the letters" technique that I scraplifted from Shannon Tidwell, a Garden Girl at Two Peas (in response to the "Scraplift a Pea" challenge). I used this sketch from Artful Delight, turned 90 degrees on its' side:
 
And I came up with this page:

Close up look at the title:
 A look at the stencil with the washi tape:
 And the "books" I cut from the the Crate Paper patterned paper and inked with Tim Holtz Old Paper Distress ink:
 
Most of the supplies for this page came from my CKC kit for this month, and I also added little droplets of sheer white homemade shimmer mist and tiny stars that I punched from red and yellow woodgrain paper. I love how it turned out! What do you think? Drop me a line and let me know!
 

Sunday, September 16, 2012

Autumn Love

Just sharing a quick and simple layout that I made with some fun Jenni Bowlin digi products!
My layout:
Supplies used:
Co'ordinations cardstock, Jenni Bowlin Mercantile Mix 4 digital papers (I printed the yellow out on watercolor paper), Jenni Bowlin Printed Tickets Stars and Stats (also printed on watercolor paper and handcut), yellow-orange Target washi tape, Wasau cream cardstock,Studio Calico Mr. Huey's Mist, a scrap of fiber that had the warm, fuzzy "Fall Feel" to it that I wanted, and Jenni Bowlin's digital leaf die cut freebie:
 
(Click on the photo to be taken to the Jenni Bowlin Studio Inspiration blog to download)
Thank you for visiting with me today, I hope you enjoyed my quick and easy LO!

Saturday, September 15, 2012

Master Forger's Challenge #1

Over at the CKCB blog, we were challenged to :

Challenge #1: Pick an OLD item from your stash and use it on your project. Don't be shy!
So, this is the page I made:

Even though it is not technically perfect, this photo is special to me, because it was taken at Christmas at my house last year, one of the last few times my family got together before my dad passed away this spring. He had just been goofing off and teasing my mom, and I got a quick snapshot of them laughing afterwards.
I mixed old and new in this layout. Items that have been in my stash forever: brads, stickers, and my sewing machine (I have had one for 12+ years, but just recently made myself start using it!). I used papers, punchouts, and stickers from Jillibean soup's Homemade 6 Bean soup collection, and I added in some aqua washi tape and Studio Calico Mr. Huey's mist.

Sunday, September 9, 2012

ScrapFriends - All about Scrapbooking: Birthday Candy Giveaway!

ScrapFriends - All about Scrapbooking: Birthday Candy Giveaway!: Woo Hoo! We're celebrating ScrapFriends first birthday in October. It was a wonderful year and I want to take this opportunity to thank a...

Thursday, September 6, 2012

Master Forgers' Hop, Part 2

Well, my power's back on. I have never seen a lightening storm like there was in my area last night! My son had football practice, and we were told to leave and go home (or wait out the storm in the field house) after 10 minutes. We chose to leave since we had to pick the other kids up from church. The ride back to our house was rather frightening (I'm glad it was my husband driving and not me!). We saw strike after strike of lightening, and and one flash of lightening struck a tree right in front of us, and a huge limb landed in the road ahead of us-my husband had to swerve/slide around it to keep from having an accident-it was huge! But, fortunately we are all fine, and the house and cars were not damaged by falling trees or limbs. And, the power is back, so I can complete my post and show you my kit for September in depth.
"Farmhouse Hobbies"
A kit that reminds me of the library and sewing rooms at my grandma's farmhouse, full of books, decorated with quilts and lovely bits of hand crocheted lace and doilies :

A closer look at the papers ( lovely mash-up of Crate Paper, Jillibean Soup, Jenni Bowlin, Studio Calico, and some cardstock):

And some of the fun extras:

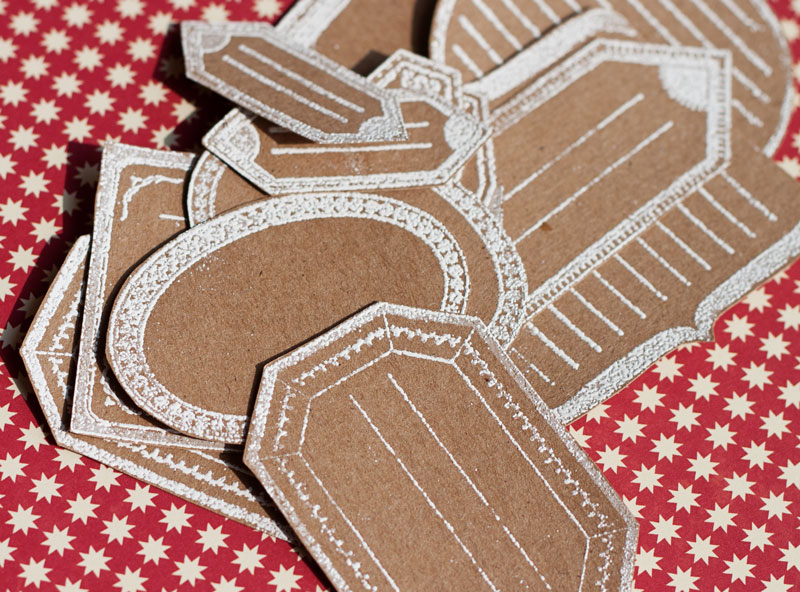
I hand stamped and embossed some white on kraft journaling spots:
Stickers from Crate Paper and Jenni Bowlin:
Some brand new stamps that I have been dying to try from swissgirl Designs, My Mind's Eye Sweetest Thing, and some Tim Holtz embossing folders:
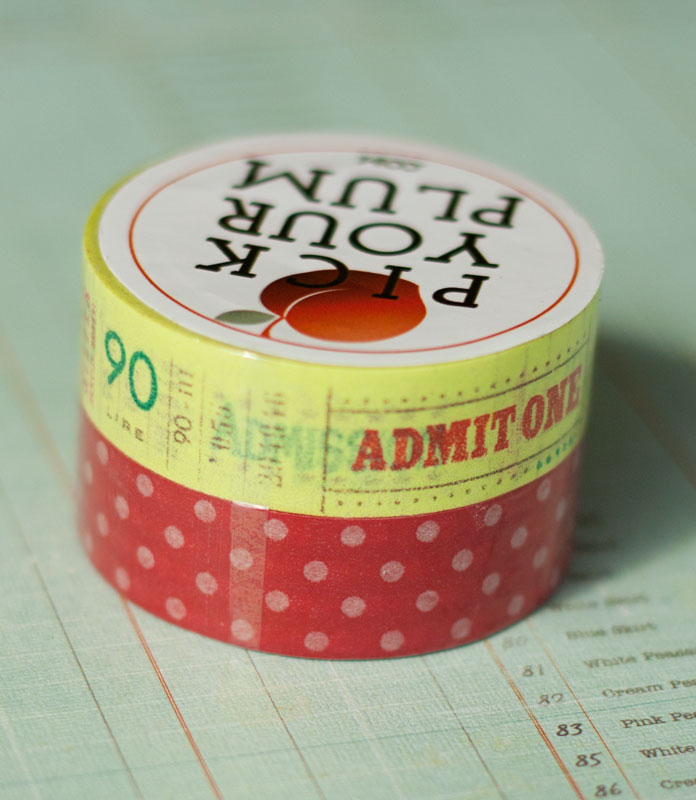
Of course, my kit wouldn't be complete without washi tape:
I threw in some gorgeous Graphic 45 chipboard buttons:
And I handmade lots of fun goodies:

Paper flowers that I cut with my Cricut Mother's Day Bouquet cart and textured paper:

Jumbo paper clips with felt bows:
And then, of course, I had to meet the challenge to make 3 CHA inspired items:


Here are the items that I was inspired by:
Jenni Bowlin wired vellum feathers (I loved, loved, loved these!)


Studio Calico Mr. Huey's Masks (I cut mine out of a cheap plastic file folder, and the plastic sheet that comes with the Cricut mats with my Cricut and SCAL)
 
 
There are so many more things from CHA that I loved, but this will give me a little bit of a "fix", and I think I will have fun playing with my "new" goodies this month!
Now, it's time to visit the other Master Forgers, and see what they have come up with for their kits this month!

Wednesday, September 5, 2012

September Master Forger's Blog Hop

Well, it's time! (this will be a short post, since lightening struck a transformer near my house, and I am posting a partial post that I had saved, using my hubby's IPhone. Please see the Counterfeit Kit Challenge blog for the blog hop lineup, and hopefully I will be able to do a more detailed kit post when the power comes back on.)
Here it is, one of my favorite parts of the month, our kit reveals! This month, we were told to be inspired by the Birds Of a Feather kit club August Kit .

We were also told to be inspired by 3 of our favorite embellishments from this summer's CHA releases, and "counterfeit" them with handmade embellies. I had a lot of fun pulling my kit, "Farmhouse Hobbies":