Thursday, February 12, 2015

Treats for Valentine's Day

Sharing a look at the classroom pass outs that I made for the twins to carry to school today. I found the cellophane bags at Hobby Lobby for 75% off after Christmas, and I knew that the red and white swirls would be perfect for Valentine's day (and when you have 4 kids you save money wherever you can!). I snatched them up for less than a dollar,and filled them with a bit of candy and a pencil (my kids love the cute pencils they get on holidays, and I know I appreciate any treats that they get that aren't sugar!).  I dusted off my Cricut Expression to make the tags, using the Sweethearts cartridge. It has some of my favorite designs of all the Cricut carts that I own, but I have found that it is also the most difficult to get a clean cut from, as well. Here are a few tips for getting a clean cut:


*Biggest tip: make sure the paper is fully adhered to the mat! If it slides around, obviously, it won't cut cleanly. If it is only partially adhered, it is more likely to snag the tiny blade. I use a pan scraper from my kitchen for this, but you could use an old credit card or store loyalty card just as easily.

*use a mat that is sticky (if you want to know why, see #1 again!)

*Not too fast, not too slow. I used speed 2, pressure 4

* Smooth cardstock works better. I only had textured in the white, though, so I worked with what I had.

Looks ok, though I see a few problems:

And a few more when I peeled off the outer edge:

*next tip-work slowly removing intricate designs from the mat
*"weed" the image from behind, in case the cardstock peels or rips slightly-then it wont show when glued to the back tag.
Not too hard, and I cut the backgrounds out of smooth red cardstock, and they cut perfectly. This is the completed treat bag:

and a lovely pile of treats for the twins to carry to school:
All they had to do was sign their names on the back ! For the tags, I used the scalloped heart tag on page 34, cut at 2 1/2 inches, and the background was the tag on page 79, also at 2 1/2 inches. I cut using the paper saver and auto fill functions, and it only took 2 sheets of cardstock for each color.

Wednesday, February 11, 2015

Workspace Wednesday and JYC #6

Here's what's on my desk right now... my March Counterfeit Kit that still needs to be photographed (you get a little sneak peek) , treats and treat bags to put together for my daughters' class (they are in 5th grade, so it's the last year I get to make pretty pass outs, booo)- this has to be done today!, a printable questionaire from the Practically Perfect Planners class that I am taking, a bottle of paint from a project that I forgot to put away, some thread from mending my son's sports bag...


Here's a look at my day 6 page from my JYC album:

My December 6th consisted of a rather long drive, so I made my page reflect that- how nice that glass wine and relaxation was upon arrival! I have never really "gotten the hang of" pocket pages-I think this layout took the longest to complete in my whole album so far, because I embellished each little square. But, all in all, I like how it turned out, and I love the mix of page styles, shapes, and sizes in my mini album! And the tiny squares were an excellent opportunity to use up some scraps and a few embellishments. Do you struggle with pocket pages, too? Or do they make things easier for you?

I am linking up at stamping-ground.com:


Tuesday, February 10, 2015

Sharing more Christmas Journal pages

As promised and not forgotten, I am getting around to making and sharing more pages in my Journal Your Christmas/ December Daily album. Today, I am sharing my pages for Days 3-5. I took the pages out of the book to photograph individually, and then replaced to show the spread, because the mix of textures, sizes,and materials are all part of the appeal for me!

Day 3, single:
This page showcases my party planning fun that I indulged in on Pinterest- my plan was to have an Ugly Sweater party for my family's get together, and there are so many great ideas for creative parties on Pinterest!

Day 4, front side:

Day 4, back:

The first spread:


Day 5 was simple, I included one of our Christmas cards from this past year:


It photographed a little weird, because I had it printed on a specialty shimmer cardstock from Shutterfly. I was very pleased with them in person, they had a good weight and feel to them!
I added a tab with some of my favorite fasteners, the American Crafts mini staples, and added some sparkle with the date. Obviously, the holes I punched are imperfect, but I don't sweat the small stuff!

The second spread:

I hope you are still enjoying seeing bits of my album, as it is all pretty paper and embellishments to me! And I love seeing any project coming together! My biggest struggle with the December albums seem to be getting all of the right pictures printed. What about you? What do you struggle with when you are trying to complete projects such as December Daily?

Sunday, February 1, 2015

Counterfeit Kit for February

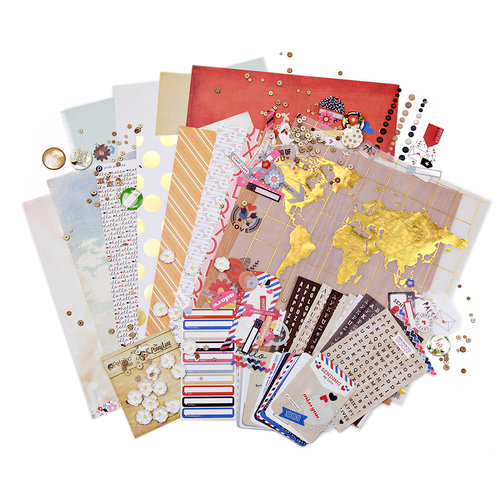
Can you believe we are already into February? I can't! This month, we are counterfeiting this fabulous kit from Scrapbook.com, Love Across The Miles:

I think I was able to pull off a pretty successful counterfeit:

Of course my papers are from older lines, but it just goes to show me that I should always go check my stash before shopping, as I probably have something very similar to the newest, most hip items! I might even like my own more. I have papers from Maggie Holmes, Shimelle, Crate Paper, and even an ancient map print from Heidi Swapp. For labels, I went into my computer and found some free printables from Studio Calico and Kaitlin Schaeffer which I printed on sticker paper, pulled a few bits from my scraps and off cuts bin, and added gems, wooden dots, flair, wood veneer, flowers, and even some wood grain chipboard hearts for embellishment.

I hope my kit inspires you to take a second look at your own stash today! Be sure and share them with us over at the Counterfeit Kit Challenge Blog-we love to see the fantastic stash kits our readers come up with!

If you would like a little closer look at the items included in the kit to copy this month, check out this Pinterest board by another DT member, Lisa.

Here's the blog list for the rest of the design team, so you can see their lovely kit counterfeits, as well:

Saturday, January 24, 2015

Counterfeit Kit Challenge Member Blog Hop (Sharing Our Kit Creations)

Hi all, and welcome to our blog hop! It is the time of the month where we share what we have been making from our stash kits-I always truly look forward to seeing what every one is making with their kit! This month I have been extremely busy with my girls' basketball team, and my son's soccer has just started as well, so this sports mama has just been living at games and practice. I love it though! And I still managed to squeak out the time to make a few pages from my January kit,
and embellishment kit,

and I have the rest of the kit papers divided up with a few pictures for me to scrap this weekend (hopefully I'll get a bit of time on Sunday). For the hop, I decided to take the challenge #3 from the CKCB blog: Turn the Negatives Into Positives
For this challenge page, I dug into my scrap basket, and pulled out a sheet of paper that I had cut several of the hexagons out of. I mounted it to a piece of the gray Glitz Watercolor paper, and used my stitching template from my kit to add a stitched word to the negative space, and added a chipboard butterfly to the negaive space in another corner. On the right side of the layout, I added a strip of the light blue chevron from Fancy Pants, and layered up various die cuts, washi, chipboard, a shaped clip, and other bits.
I made another layout from the kit as well, using a Cuttlebug Pixie Dust Circle frame die and embossing folder that I purchased years ago and never used up unto this point, and put it to use with the green cardstock scraps. I used lots of lovely layers on this page, some from the Shimelle line, some from Dear Lizzy, even some of the ancient chipboard letters and Heidi Swapp Gel Blossoms!

And, since they're both Disney pages, I added Hidden Mickey's to both pages for fun. Here's a closer look at the embellishments:


Thank you for hopping along with us today! Here's the complete list, in case you get lost along the way:
Lisa                 http://lisahausmann.blogspot.de
Tina                 http://tinasscrapcorner.blogspot.com/
Susanne          http://snapsandsnippets.blogspot.com
Laura               http://beadsbuttonsandbirds.blogspot.co.uk/
Margie             http://scrappinmargie.blogspot.com
Virginia            http://celtichouse.blogspot.co.uk
Jemma            http://just-jimjams.blogspot.co.uk


Monday, January 5, 2015

Journal Your Christmas: Completed Cover and Day 2

As promised, I am back to share my JYC album in bits and pieces, with the hope that blogging about it will motivate me to get it finished. As promised, here is the completed cover, and a beginning look at the inside:
Cover:


Day 2:

Thursday, January 1, 2015

Counterfeit Kit Challenge January 2015 Kit

Hi all! Happy New Year! After taking a bit of a bloggy break for the month of December, I am back with a vengence to start off 2015!  After being surrounded with December/ Christmas products for a moth, I am ready for a fresh start for this new year, in my home, food, and my crafting. For my crafty fun, I made up a kit of supplies for this month's Counterfeit Kit. The kit we were given for inspiration was the December Hip Kit:
Soft teals and pink? Right up my alley! I knew I had some stuff that would work for this inspiration! Here is my kit of supplies, which I am calling "New Beginnings":

List of supplies in the original kit:


  • American Crafts - Amy Tangerine Stitched - Applique Paper
  • American Crafts - Amy Tangerine Stitched - Flora Paper
  • American Crafts - Amy Tangerine Stitched - Loom Paper
  • American Crafts - Amy Tangerine Stitched - Map of My Heart Paper
  • American Crafts - Amy Tangerine Stitched - Thrifted Paper
  • Pebbles - Happy Day - Sunday Paper Paper
  • Heidi Swapp - September Skies - Aspen Paper
  • Heidi Swapp - September Skies - Afternoon Breeze Paper
  • Heidi Swapp - September Skies - Meadow Bloom Paper
  • American Crafts - Amy Tangerine Stitched - Ephemera
  • American Crafts - Amy Tangerine Stitched - Rub-Ons
  • Pebbles - Happy Day - Woodgrain Thickers
  • Evalicious - Photo Shoot - Wood Veneer Shapes
  • Evalicious - Photo Shoot - Puffy Stickers
A Closer look at the papers:


My kit list:
  • Crate Paper- Maggie Holmes Flea Market- Heirloom Paper 
  • Fancy Pants- What a Wonderful Day- What a Wonderful Day Strips Paper
  • October Afternoon- Midway- Ticket Booth Paper
  • October Afternoon- Farm Girl- Wooden Crate Paper
  • October Afternoon- Woodland Park- Cat Tail Pond Paper
  • Elle's Studio- You&Me- Lovely Stripes Paper
  • Fancy Pants- What a Wonderful Day- Swell Paper
  • Basic Grey- Lucille- Kitten Heels Paper
  • Teresa Collins- You Are My Happy- Hearts Paper
  • October Afternoon- Sidewalks- Capture The Flag
  • American Crafts- Dear Lizzy 5th&Frolic-Pretty Parkway Paper
  • American Crafts- Shimelle- Rubin Paper
  • American Crafts- Shimelle- Leavitt Paper
  • American Crafts- Shimelle- Herschel Paper
  • Glitz Designs- Wild&Free- Gray Watercolor Paper
  • American Crafts- Amy Tangerine Yes Please- Truth Paper
  • American Crafts- My Girl- Precious Penny Paper
  • American Craft- Dear Lizzy Polka Dot Party- Dazzling Decor Paper
  • Core'dinations- Core Essentials Cosmo Cricket Neutrals- Gray Woodgrain Embossed Cardstock (I inked with white ink for a whitewashed look)
  • October Afternoon- Lunchbox- Picnic Table- Sticker Alpha Set
  • American Craft- Shimelle- Cork Stickers
  • Studio Calico painted Chipboard Camera Stickers
  • Studio Calico Essentials Woodgrain Chipboard Cameras
  • Teresa Collins- You Are My Happy- Ephemera Pack
  • Basic Grey Rub-On Pack
  • Heidi Swapp- Light Pink Gel Blossoms (these are ancient)
  • October Afternoon- Daily Flash Apple Cider-Pop Drops Enamel Stickers
I was having so much fun making my kit, that I decided to do a couple of the add-on kits as well. 

Their color add-on kit:


My color add-on kit:


And the embellishment add-on:
(theirs):

Mine:

And I forgot about them while photographing, but I do have 3 shaped clips in there as well.

All in all, I am very happy about this fresh, colorful kit with a mix of (very) old and new supplies, and can't wait to use up some stash! 

If you by way of the Counterfeit Kit Challenge blog, I am your last stop on the hop, and you have seen some lovely kits to be inspired by already. If not, grab a cuppa and settle in-here's the full list of the CKC design team to hop around to:

I will be sharing my December Daily Journal over the next few days- I am not exactly finished, but will share what I have so far. Thanks for dropping by, I'd love for you to leave me a comment!

Tuesday, December 2, 2014

Journal Your Christmas Day 1/Cover still under Construction

I'm still working on my cover and waiting for paint to dry, so here's a peek at it:

but, my main reason for popping by the blog today is to share my journal entry/title page for yesterday:
I have been wanting to try the sequins in the pocket idea for a while now, but my sewing machine is covered up right now. So, I just taped it with my washi tape, and the sequins are trying to escape in the photo, so, I just glued it shut with a bit of Glossy Accents and restuck the washi, and I am not going to worry about rephotographing it. You get the idea, right?
My Christmas Manifesto for this year: Rekindle the Magic- for myself and the kids. Slowly but surely add the special touches that bring the sparkle and joy to their eyes and happy smiles.

With that being said, I am going to get off the computer for a while, turn on National Lampoon's Christmas Vacation, and clean and work on decorating for a while! I will try to update my blog regularly as I add to my Journal Your Christmas album for this year, and I may just share some previous December minis as time allows, so be sure to check back. Have a lovely, sparkly day!