I am still feeling very inspired by Wilna Furstenberg as I prepare for today's edition of Saturday Scrapbook Stamping. This page was inspired by a layout that she did for her Art and Design workshop at the old Big Picture classes. My page is a little different from Wilna's, but I did want to share what inspired me to get started and go in this direction. I am also using some of the cut files that she included in the class downloads (the die cut title and light bulbs).
This will be an adventure, as I have never stamped with mist before. Won't you come and learn with me?
I started by spraying mist from my April kit into a styro plate:
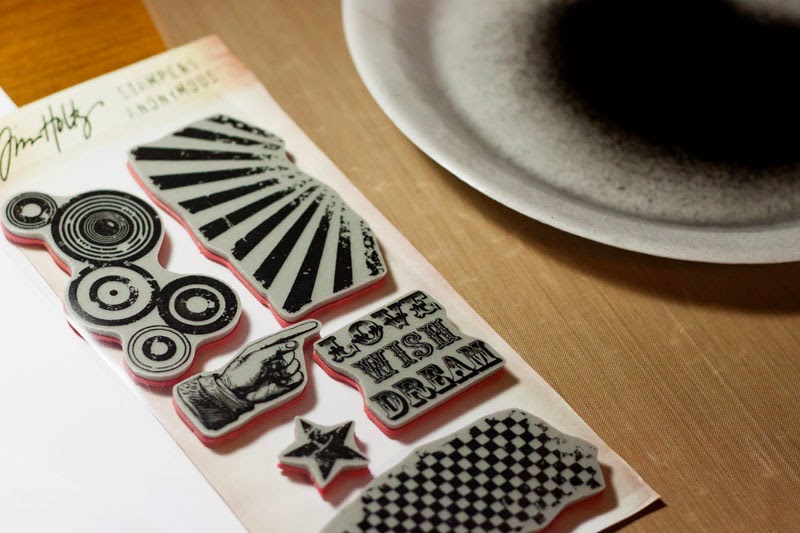
I then selected some stamps-Tim's stamp set should give just the grungy look I want:
And inked it up. As you can see, the mist pooled quite heavily in some areas:
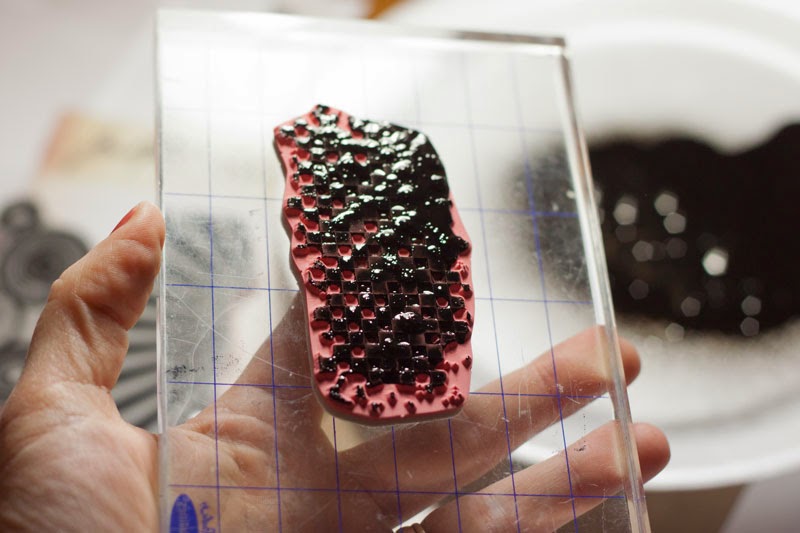
So I stamped a few times before inking again, and repeated across the center of the page:
I liked the look at this point, but felt like it needed a bit more. So, I dripped the remainder of the mist onto the page:
And this is how it looked when I was finished:
I still wanted a bit more variation, so I gave it a quick shot of mist from about 12 inches above for a fine mist, and then took the nozzle out of the bottle to make few more small drips and splatters with the straw:
*WARNING! Spraying from high above it did cause the mist to over spray my craft mat a little bit!
I liked it at this point, so I let it dry while I did my die cutting, and then mounted it to a sheet of black and white cardstock from my kit:
Now I decided to have a bit of a play with my homemade texture paste:
I wanted it to be yellow, so I dumped some homemade yellow mist (I thought I dumped too much, but it turned out about right):
I mixed it up and added a spritz of Gold Lame as well:
Then I put the light bulbs on the page where I wanted them to be:
And picked them up one cluster at a time, and added a thick layer of the colored paste:
And then set the cut files on top of the paste. After they dried a bit, I pressed them down into the paste a little bit more:
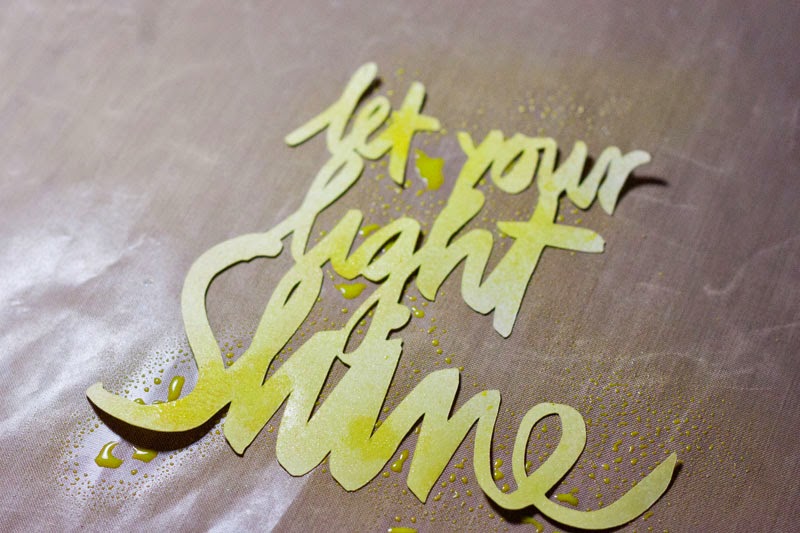
I die cut the title out of a light yellow cardstock scrap, but it was too light, so I decided to mist it with my homemade mist:
There, I like it better already!
I added my photo (after rounding the corners and doing an offset mat on two PL cards from my kit), some scraps, some of the yellow vellum hearts, and some of the black sequins, and a few dabs of Paper Glaze where the light bulbs hadn't adhered completely, adhered the title, and came up with a fun, artsy page, very much inspired by Wilna, that used quite a few bits from my kit, and stamping in a different sort of way!
I hope I inspired you to break out your stamps today!
Showing posts with label Glimmer Mist. Show all posts
Saturday, April 25, 2015
Wednesday, November 16, 2011
Sketchy Thursdays Guest Design Team Entry
When Sketchy Thursdays posted this fun sketch with the theme of "gratitude", I thought it would be fun to play along! I am so grateful to my sweet kiddos for their patience as I try to learn and enhance my photography skills. This was one of those photo shoots!
The sketch:
My layout:
A closer look at my handmade rosette and die cut leaves:
Supplies I used were all from my November kit: SEI Dill Blossom Licorice, Tim Holtz Kraft Resist cardstock which I misted with Turquoise Glimmer Mist and dripped with Moonlight Smooch, Basic Grey cardstock letter stickers, Making Memories journaling spot,leaves that I die cut using one of the gem shapes from Once Upon A Princess cartridge using my Cricut from Wasua crinkle textured cardstock, and my rosette that I made from scraps. Thank you for stopping by today!
The sketch:
My layout:
A closer look at my handmade rosette and die cut leaves:
Supplies I used were all from my November kit: SEI Dill Blossom Licorice, Tim Holtz Kraft Resist cardstock which I misted with Turquoise Glimmer Mist and dripped with Moonlight Smooch, Basic Grey cardstock letter stickers, Making Memories journaling spot,leaves that I die cut using one of the gem shapes from Once Upon A Princess cartridge using my Cricut from Wasua crinkle textured cardstock, and my rosette that I made from scraps. Thank you for stopping by today!
Wednesday, October 26, 2011
It's A Blog Hop...AND a Pretty Paper Party!
It's time for the Master Forger's Blog Hop-and here is the challenge we were given this month:
I have several pages to share, some using stickers and some not, since I won an entrance to Shimelle's Pretty Paper Party, I have been combining as many challenges as possible, using up lots of pretty papers from my paper scraps and Counterfeit kit, and more importantly, getting lots of scrapping done!!
The first day's prompt was to mix and match strips of patterned paper (which is easy if you just happen ;-) to have a piece of border strips paper in your kit). I also used one of Shimelle's sketches for Day 1.
My Layout,"Just Breathe":
My "Sticker in Disguise":
I mounted it on a chipboard flower and added some bling to the center-love making it dimensional!
Supplies I used for this layout:
A piece of GCD Studios pink cardstock from a previous CKCB kit, Echo Park Life Is Good Border Strips, a salmon pink handmade ribbon flower, Echo Park Life Is Good Element and Alpha stickers, a pink rhinestone from my kit, and a journaling spot from my stash.
The prompt for Day 2 was to use a patterned background-again, I followed a sketch from Shimelle:
I am not so sure I love the way this page turned out, but I ripped it apart twice and changed it around, so I finally decided I was done, and it was time to move on to the next page. It kind of feels off balance, so I may add a little something to the right side, but for now, I am walking away! The way I disguised the stickers here: I layered them on cardstock and with other stickers.
Supplies Used:
Making Memories Spellbound "Glitter Crow", American Crafts Halloween Stickers, Basic Grey Eerie Pops Stickers, Making Memories Spook Alley rub-on house, a stamp from my Halloween kit, and some orange bling from my stash
I skipped Day 3's Prompt, since it was all about making a kit up from your stash, and I kind of already do that ;-)
Day 4's prompt was to use dots and/or stripes-and possibly mix in another pattern such as a floral.
Here's my page:
I used a sketch loosely for this one.Supplies used:
American Crafts Play "Paper Dolls", The Girls Paperie Paper Girl "Die Cut Wallpaper", a piece of pink scalloped felt ribbon, pink Primas and bling, a handmade pink flower from my stash, and Echo Park Element and Alpha stickers, and an American Crafts Remarks journaling spot.
One of the prompts from Day 5 was to make it messy or distressed, and I used Shimelle's sketch for the day.
My Layout:
And a closer look at my "disguised stickers" here:
On the star sticker, I just added bling to the center, and for the Thickers-I "disguised" a P, and turned it into an R with a little creative cutting.
Supplies I used for this page:
patterned papers from the DCWV All About Boys stack, pieces of red and light blue cardstock from my scrap stash, American Crafts Thickers (from 3 different sets-the black glitter chipboard letters were in my Halloween kit this month, the other 2 were in past kits), Sapphire Glimmer Mist by Tattered Angels that I dripped/flicked on the page, red rhinestones from my stash, and the red stars are from Jenni Bowlin.
Thanks for hopping by, be sure to visit our sponsor for this month, Momenta , and be sure to "like" them on FB for a chance to win an AWESOME prize pack!
Here is the blog hop order:
BLOG HOP CHALLENGE: Alter some stickers and use them in an unexpected way on your project. Let's see if we can even recognize them as stickers any more!
I have several pages to share, some using stickers and some not, since I won an entrance to Shimelle's Pretty Paper Party, I have been combining as many challenges as possible, using up lots of pretty papers from my paper scraps and Counterfeit kit, and more importantly, getting lots of scrapping done!!
The first day's prompt was to mix and match strips of patterned paper (which is easy if you just happen ;-) to have a piece of border strips paper in your kit). I also used one of Shimelle's sketches for Day 1.
My Layout,"Just Breathe":
My "Sticker in Disguise":
Supplies I used for this layout:
A piece of GCD Studios pink cardstock from a previous CKCB kit, Echo Park Life Is Good Border Strips, a salmon pink handmade ribbon flower, Echo Park Life Is Good Element and Alpha stickers, a pink rhinestone from my kit, and a journaling spot from my stash.
The prompt for Day 2 was to use a patterned background-again, I followed a sketch from Shimelle:
I am not so sure I love the way this page turned out, but I ripped it apart twice and changed it around, so I finally decided I was done, and it was time to move on to the next page. It kind of feels off balance, so I may add a little something to the right side, but for now, I am walking away! The way I disguised the stickers here: I layered them on cardstock and with other stickers.
Supplies Used:
Making Memories Spellbound "Glitter Crow", American Crafts Halloween Stickers, Basic Grey Eerie Pops Stickers, Making Memories Spook Alley rub-on house, a stamp from my Halloween kit, and some orange bling from my stash
I skipped Day 3's Prompt, since it was all about making a kit up from your stash, and I kind of already do that ;-)
Day 4's prompt was to use dots and/or stripes-and possibly mix in another pattern such as a floral.
Here's my page:
I used a sketch loosely for this one.Supplies used:
American Crafts Play "Paper Dolls", The Girls Paperie Paper Girl "Die Cut Wallpaper", a piece of pink scalloped felt ribbon, pink Primas and bling, a handmade pink flower from my stash, and Echo Park Element and Alpha stickers, and an American Crafts Remarks journaling spot.
One of the prompts from Day 5 was to make it messy or distressed, and I used Shimelle's sketch for the day.
My Layout:
And a closer look at my "disguised stickers" here:
On the star sticker, I just added bling to the center, and for the Thickers-I "disguised" a P, and turned it into an R with a little creative cutting.
Supplies I used for this page:
patterned papers from the DCWV All About Boys stack, pieces of red and light blue cardstock from my scrap stash, American Crafts Thickers (from 3 different sets-the black glitter chipboard letters were in my Halloween kit this month, the other 2 were in past kits), Sapphire Glimmer Mist by Tattered Angels that I dripped/flicked on the page, red rhinestones from my stash, and the red stars are from Jenni Bowlin.
Thanks for hopping by, be sure to visit our sponsor for this month, Momenta , and be sure to "like" them on FB for a chance to win an AWESOME prize pack!
Here is the blog hop order:
- http://just-jimjams.blogspot.com/
- http://mypair-a-dice.blogspot.com/
- http://truelifeimascrapaddict.blogspot.com/
- http://julieannshahin2.blogspot.com/
- http://lovejoyscrap.blogspot.com/
- http://lisahausmann.blogspot.com/
- http://scrappinmargie.blogspot.com/ (you are here)
- http://millermall.blogspot.com/ (go here next)
- http://howiburb.blogspot.com/
- http://www.snapsandsnippets.blogspot.com/
Monday, February 7, 2011
February Counterfeit Kit
I had soooo much fun playing along with the Counterfeit Kit Club blog last month, so I couldn't wait to see what they had for us this month! They didn't disappoint! The kit they chose to scraplift this month was an awesome kit from Scraps Of Darkness kit club, shown below:
The first thing I thought when I saw this kit was, "Very French, very sexy, and a little, well, dark." Not exactly my normal style, but gorgeous, and I want to push my creative boundaries, so I made a kit as similar as I could, and even made my own version of all of the add on kits from my stash:
My February Counterfeit Kit:

Kit contents:
Making Memories Red Glitter Love Notes
SEI Chocolat Noisette (2) , Eclair
Basic Grey Eskimo Kisses Starry Night, Berry Frost
Teresa Collins Damask Invitation and Damask Decor
Creative Imaginations die cut flourished paper
GCD Studios Paris Nights Collection Black shimmer with cream polka dots(2), Vintage parisian collage
Bazzill Wild Pansy Diamond Print Glazed cardstock
3 printed digipapers:
Red Uptown Houndstooth from Lindsay's Stamp Stuff from MyGraphico
Hearts and Diamonds from Family Game Night Papers from Design House Digital
Argyle Print from Jessica Sprague Echoes of Asia kit (was green, I played with it in Photoshop)
decorative vintage pins that I received in a swap
Spare Parts gemstone flower brads
2 ANCIENT red leather photo corners from Making Memories
pink twine
Prima Say It In Crystals
Prima pink and black Crystal Flowers
2 ZVA Creative flourishes (pink and lavendar)
1 light green Prima flower
Basic Grey Painted Brads
With Charm mini golden frame
Doodlebug rub-on letters (partial pack)
Anna Griffin Peyton Collection journal tags
American Crafts Remarks journaling sticker books
1 vintage ephemera french receipt
black tulle
black grosgrain ribbon
small pink and white flowers

A close up of my patterned papers:

My Cardstock Add-on kit: ( I ran out of cardstock very early last month, so I needed some more this month!)
So here is my cardstock list:
SEI Chocolat Raisine, Rose (1 each)
2 Wasau White with silver shimmer
1 Bazzill burgundy Swiss Dots
2 Bazzill ?blueberry?
1 Paper Studio textured burgundy cardstock
2 Bazzill pale lavendar
2 Bazzill light pink
2 Walmart black
My Romance Add-On Kit:
Thickers Tiara Accents Glitter Shapes
Thickers Sprinkles white glitter chipboard letters
Making Memories Garden Party shimmer letter stickers partial sheet
Maya Road Cherry Blossoms rub-ons
ZVA Creative flourishes
Jenni Bowlin Journaling Cards
Tim Holtz Grungeboard shapes
Basic Grey Undressed chipboard shapes
assortment of seam binding and trims-pink, red, and lavendar
Pink Heidi Swapp Felt Butterflies
Making Memories Vintage Findings medium kit-"Love"
My Color Add-On Kit:
I made my own Glimmer Glams for some of these colors:
Crimson, Silvery Onyx, Concrete shimmer, Hot Lips hot pink sparkle, Ruby Shimmerz, Homemade dark Cherry Shimmer, Homemade Plum Crazy shimmer, Pink Sparkles puffy paint, Pink, Lavendar, and Denim Distressed Stickles, Silver Making Memories paint(if yours are sort of dried out like mine, you can add a bit of warm water and shake really well to get them flowing again),Rose Tea Glimmer Mist, and Tim Holtz Picket Fence Crackle paint. I plan to make some stencils/misting screens with my Cricut, and I will share those when I am finished!
This was so much fun to put together, and I cant wait to make some decorative pebbles, flourished heart and masks, and maybe turn some of that Grungeboard and chipboard into faux metal accents! And make pages and cards too, of course! And of course I'll share it all here when I do it!
The first thing I thought when I saw this kit was, "Very French, very sexy, and a little, well, dark." Not exactly my normal style, but gorgeous, and I want to push my creative boundaries, so I made a kit as similar as I could, and even made my own version of all of the add on kits from my stash:My February Counterfeit Kit:

Kit contents:
Making Memories Red Glitter Love Notes
SEI Chocolat Noisette (2) , Eclair
Basic Grey Eskimo Kisses Starry Night, Berry Frost
Teresa Collins Damask Invitation and Damask Decor
Creative Imaginations die cut flourished paper
GCD Studios Paris Nights Collection Black shimmer with cream polka dots(2), Vintage parisian collage
Bazzill Wild Pansy Diamond Print Glazed cardstock
3 printed digipapers:
Red Uptown Houndstooth from Lindsay's Stamp Stuff from MyGraphico
Hearts and Diamonds from Family Game Night Papers from Design House Digital
Argyle Print from Jessica Sprague Echoes of Asia kit (was green, I played with it in Photoshop)
decorative vintage pins that I received in a swap
Spare Parts gemstone flower brads
2 ANCIENT red leather photo corners from Making Memories
pink twine
Prima Say It In Crystals
Prima pink and black Crystal Flowers
2 ZVA Creative flourishes (pink and lavendar)
1 light green Prima flower
Basic Grey Painted Brads
With Charm mini golden frame
Doodlebug rub-on letters (partial pack)
Anna Griffin Peyton Collection journal tags
American Crafts Remarks journaling sticker books
1 vintage ephemera french receipt
black tulle
black grosgrain ribbon
small pink and white flowers

A close up of my patterned papers:

My Cardstock Add-on kit: ( I ran out of cardstock very early last month, so I needed some more this month!)
So here is my cardstock list:SEI Chocolat Raisine, Rose (1 each)
2 Wasau White with silver shimmer
1 Bazzill burgundy Swiss Dots
2 Bazzill ?blueberry?
1 Paper Studio textured burgundy cardstock
2 Bazzill pale lavendar
2 Bazzill light pink
2 Walmart black
My Romance Add-On Kit:

Thickers Tiara Accents Glitter Shapes
Thickers Sprinkles white glitter chipboard letters
Making Memories Garden Party shimmer letter stickers partial sheet
Maya Road Cherry Blossoms rub-ons
ZVA Creative flourishes
Jenni Bowlin Journaling Cards
Tim Holtz Grungeboard shapes
Basic Grey Undressed chipboard shapes
assortment of seam binding and trims-pink, red, and lavendar
Pink Heidi Swapp Felt Butterflies
Making Memories Vintage Findings medium kit-"Love"
My Color Add-On Kit:
I made my own Glimmer Glams for some of these colors:Crimson, Silvery Onyx, Concrete shimmer, Hot Lips hot pink sparkle, Ruby Shimmerz, Homemade dark Cherry Shimmer, Homemade Plum Crazy shimmer, Pink Sparkles puffy paint, Pink, Lavendar, and Denim Distressed Stickles, Silver Making Memories paint(if yours are sort of dried out like mine, you can add a bit of warm water and shake really well to get them flowing again),Rose Tea Glimmer Mist, and Tim Holtz Picket Fence Crackle paint. I plan to make some stencils/misting screens with my Cricut, and I will share those when I am finished!
This was so much fun to put together, and I cant wait to make some decorative pebbles, flourished heart and masks, and maybe turn some of that Grungeboard and chipboard into faux metal accents! And make pages and cards too, of course! And of course I'll share it all here when I do it!
Wednesday, October 13, 2010
I Vant To Drink Your Blood...

Cackle,cackle! And, guess what...it's another way to use my favorite stamp set! I promise, I'll try to move on to another set next week, but I just wanted to show one more way to use this awesome set! I used a black shimmer cardstock for the background, cut a scalloped square with my Winter Woodland Cricut cartridge on Fit to Page, using GCD Studios Paris Nights flocked cardstock. Then, a smaller square of GCD Studios Paris Nights cardstock, a shimmer this time, inked the edges with red ink, and dripped Candy Apple Red Tattered Angels Glimmer Mist to look like blood, then mounted a photo of my son drinking "blood punch" from a skull cup on Bazzill Swiss Dots cardstock. I used the Lindsay's Stamp Stuff Vintage Halloween Labels
as a banner, dripping the Candy Apple Red Glimmer Mist on the banners (I made a bunch more of them for a swap, as well), and I inked the edges with silver ink, punched holes and threaded black satin ribbon through them. To finish the page, I took a red lollipop flower that I received from another swap, a white paper "doily" that I cut with my Cricut and an svg file, dripped Glimmer mist on the doily, inked the edges of everything with silver ink, then twisted and hot glued black tulle to the back, then added the embellishment to the page.I added a bit of black tulle under the mini-banner to ground it, as well.Challenges that I am entering this week are:
- Aly's Sunday Challenge- Halloween
- Bee Crafty-Halloween, using a digital image
- Crafty Ann's-use at least one digital image and your favorite coloring medium (shimmer ink spray)
- Crafts and Me Challenges-Halloween
- Create 4 Fun-use a digi
- Creative Cottage Challenge Blog-halloween
- Double Dutch Challenges- halloween
- Everybody Art Challenges-Halloween
- Easy Craft Projects-Halloween
- Fussy And Fancy Challenges-Halloween
- Inky impressions-Anything Goes
- Karber's Challenges-halloween using a digi
- The Stamping Boutique-fall/ halloween
- Mel Jen's-halloweeny
- Paper Pretties-black, white, and one other color
- Stamp Scrap And Doodle Saturdays-Halloween or Fall project
- Stamp N Doodle-Halloween
- Suchins-Halloween
Thanks for stopping by and letting me share with you today!Head by Lindsay and the other designers' blogs Thursday at 10 am (ET) for inspiration and a freebie!And, Thursday through Saturday, Lindsay's Stamp Stuff is having a 30% off sale-everything in the store!
Lindsay Weirich (Owner & Stamp Designer)
Cheryl Gorka (DT Coordinator)
Cindi Hooks
Diane Bove
Jennifer Bliss
Karin Martin
Laurel Seabrook
Leanne Garner
Margie Visnick
Micki Harper
Rhonda Walker
Shannon Neparko
Tamara Bennett
Tracey Allen
Wednesday, July 14, 2010
Travel Mini Album
Since my family is going on vacation soon, I thought it would be nice to have a mini album/journal for us to record our memories as we go. This is what I came up with.


Stamp With Sarah Kay: anything Goes
Lindsay Weirich (Owner & Stamp Designer)
Cheryl Gorka (DT Coordinator)
Cindi Hooks
Diane Bove
Jennifer Bliss
Karin Martin
Leanne Garner
Lisa Jurecek
Margie Visnick You are here!
Melissa Craig
Rebekah Doak
Rhonda Walker
Shannon Neparko
Tamara Bennett
Tracey Allen
Micki Harper
Sometimes guest
Erin Bailey
The whole album is made up of the plain sheets of Tim Holtz Grungeboard. I punched 3 holes in the end with my Crop-A-Dile Big Bite, and put on book rings ( easy to take off and put on as I finished them).

For the cover, I inked the Grungeboard with "Tumbled Glass" Distress Ink pad, then misted it with Turquoise , Riptide, Sea Glass, and Sand Glimmer Mists. I colored this lovely sketch from Lindsay's Stamp Stuff
Seaside Sketches digistamp set with colored pencils, glued it to the cover of my mini, then surrounded the scene with tiny glass beads in various blues and golds, to mimic sand and water. The letters for the word "Travel" are from Making Memories Passport collection but they were flat stickers, so I attached them to a scrap of Grungeboard, and trimmed the excess.I added a Prima flower and a strand of golden brown beads. I decorated the book rings with various blue and white ribbons, tulle, and twill, and added a Grungeboard "key", that I embossed with gold embossing powder (looks real. huh? ;-) ).
For this part, I attached papers from the Making Memories Passport collection to the Grungeboard, and misted with turquoise, sand, and sea glass Glimmer Mists (very lightly). for the right side, I added a journaling sticker from the Passport collection.
For the center, I added a little journaling card from Crafty Secrets, and an envelope for memorabilia that I cut from Kraft paper using
Lindsay's Stamp Stuff's Envelope Bonanza svg set.
The right side is also misted with Glimmer Mist, and I added an embossed golden keyhole and brads, and inked the edges with Sapphire Distress Ink.
For the center, I added a little journaling card from Crafty Secrets, and an envelope for memorabilia that I cut from Kraft paper using
Lindsay's Stamp Stuff's Envelope Bonanza svg set.
The right side is also misted with Glimmer Mist, and I added an embossed golden keyhole and brads, and inked the edges with Sapphire Distress Ink.
For the next pages, I used some light blue papers from the Passport collection, and stamped a border and title with some stamps from the Passport collection and Tumbled Glass Distress Ink.
For the center I used a Margarita digistamp freebie, which I printed on white cardstock, cut and embossed with my one Nestie, colored with my Copics, inked the edges with "Tumbled Glass" Distress Ink. I covered my "Blue Hawaiian" with Crystal Stickles, and my hurricane glass with Glossy Accents. For the right side, I used another Passport stamp and "Tumbled Glass" Distress Ink, and tied an "island blue" sheer ribbon for accent.
On the next pages, I used "sand" style paper from DCWV.
On the left side, it is accented with sheer ribbon and a travel journaling tag from K&Co, which I also tied a sheer ribbon onto.
I added another Crafty Secrets journaling card, and a Making Memories shaped journaling note paper.
For the right side, I simply accented it with a ZVA Creative rhinestone flourish to evoke the feeling of a water spray or splash.
On the left side, it is accented with sheer ribbon and a travel journaling tag from K&Co, which I also tied a sheer ribbon onto.
I added another Crafty Secrets journaling card, and a Making Memories shaped journaling note paper.
For the right side, I simply accented it with a ZVA Creative rhinestone flourish to evoke the feeling of a water spray or splash.
On the next pages, I left the grungeboard bare, and misted with sapphire, riptide, turquoise, and sea glass Glimmer Mists, dried with my heat embossing tool, and re-misted, and dried again.
Then, I rubbed my glue pad on the edges, dipped them in gold embossing powder and heated. I added an orange hibiscus journaling tag from K&Co to the center.
The next pages are covered with some DCWV travel pages, inked the edges with Tim Holtz Walnut Stain Distress Ink.
On the right side, I added a tiny envelope from Lindsay's Stamp Stuff Envelope Bonanza svg set, and a tiny road sign that I cut from an svg I picked up somewhere (I have no idea where or I would share the link).
Anyway, I cut it, stamped a tiny palm tree with a Studio G stamp, and inked the edges.
On the right side, I added a tiny envelope from Lindsay's Stamp Stuff Envelope Bonanza svg set, and a tiny road sign that I cut from an svg I picked up somewhere (I have no idea where or I would share the link).
The next 2 pages are for the day of my sister's wedding, so I tried to make them a bit more elegant.
I attached a creamy white shimmer swirl paper to a kraft background. I finished it off with a black Doodlebug Frill.
I tied a tiny organza bag in the center to hold a small souvenir or momento.
I attached a creamy white shimmer swirl paper to a kraft background. I finished it off with a black Doodlebug Frill.
I tied a tiny organza bag in the center to hold a small souvenir or momento. 
The last 2 pages are dedicated to the drive home. 
I used paper from DCWV's Mango Frost stack, and stickers/journaling spot from Making Memories Passport collection.
For the back cover, I left the Grungeboard bare, then misted with Sand Glimmer Mist, Mango, Treasured Hymn, Trufflez, Ruby, and Bed of Roses Shimmerz. To finish off the back cover, I colored another digistamp from Lindsay's Seaside Sketches.
Challenges that I am entering this mini album into are:
Bunny Zoe's Crafts: Summer Days
By the Cute And Girly:Warm Summer Days
Clearly Delightful:Pearls, Bling, and Button Things
Crafty Calendar Challenge: Summer (with the option of using yellow)
The Crafty Pad: Use yellow and orange and some holes (I punched my own holes in the Grungeboard)
The Belli Challenge: Alter It and use up old stash ( I altered and used up a ton of Grungeboard that I have had for at least a year, along with a bunch of ribbon and other goodies)
Creative Cottage: no cards allowed
Creative Craft Challenges:Summer Lovin'
Practical Scrappers: Embossing
I used paper from DCWV's Mango Frost stack, and stickers/journaling spot from Making Memories Passport collection.
For the back cover, I left the Grungeboard bare, then misted with Sand Glimmer Mist, Mango, Treasured Hymn, Trufflez, Ruby, and Bed of Roses Shimmerz. To finish off the back cover, I colored another digistamp from Lindsay's Seaside Sketches.Challenges that I am entering this mini album into are:
Bunny Zoe's Crafts: Summer Days
By the Cute And Girly:Warm Summer Days
Clearly Delightful:Pearls, Bling, and Button Things
Crafty Calendar Challenge: Summer (with the option of using yellow)
The Crafty Pad: Use yellow and orange and some holes (I punched my own holes in the Grungeboard)
The Belli Challenge: Alter It and use up old stash ( I altered and used up a ton of Grungeboard that I have had for at least a year, along with a bunch of ribbon and other goodies)
Creative Cottage: no cards allowed
Creative Craft Challenges:Summer Lovin'
Drunken Stampers: Water (I will be adding beach photos as soon as I have them, as well)
Easy Crafts Projects: Challenges: summer
If The Shoe Fits...Scrap it:vacation
For Fun Challenges: Hand colored design
Easy Crafts Projects: Challenges: summer
If The Shoe Fits...Scrap it:vacation
For Fun Challenges: Hand colored design
Stamp With Sarah Kay: anything Goes
Now, my album is ready, bring on the vacation!!
Thanks for looking, now head over to Lindsay and the rest of the DT's blogs for lots of inspiration and a freebie!!
Lindsay Weirich (Owner & Stamp Designer)
Cheryl Gorka (DT Coordinator)
Cindi Hooks
Diane Bove
Jennifer Bliss
Karin Martin
Leanne Garner
Lisa Jurecek
Margie Visnick You are here!
Melissa Craig
Rebekah Doak
Rhonda Walker
Shannon Neparko
Tamara Bennett
Tracey Allen
Micki Harper
Sometimes guest
Erin Bailey
Subscribe to:
Posts (Atom)