Showing posts with label Thickers. Show all posts

Monday, July 11, 2016

Magic Monday... Celebrate the Magic

For today's edition of Magic Monday, I took the challenge from Disneyscrappers
Night Magic Challenge 
Nothing is as beautiful at night as a Disney Park, it just twinkles and sparkles all around you.
The lighting around the parks, the parades, and the spectacular shows. I know you have many many night time photos that you want to scrap, but it can be intimidating.
For this challenge create a layout using photos taken at night in a Disney Park or Resort.
You must add something that sparkles
And also use these 3 night time Disney colors:
PinkYellow/Gold, and Blue/Teal
This challenge was the perfect inspiration to scrap this photo from the "Celebrate The Magic" castle show the last time we were at the Magic Kingdom. I used supplies from my April CKC kit, "Secret Garden." I made the journaling card in my Project Life app, and printed it at home. The glittery blue snowflakes were the only thing that were not in the kit, but I felt that this would be the perfect opportunity to use up the package and give a little nod to Frozen.

Sunday, May 17, 2015

Sharing my homework...Wilna's Art And Design Class

This class was one of my favorite classes related to scrapbooking that I have ever taken! For any one that missed the original run of it on Big Picture Classes old website, she is now offering it in her shop, iheartstudio . I felt it was well worth the cost of admission, just for the cut files, much less the wonderful inspiration and instruction! Here are a few more of my pages inspired by the class, click on "Wilna's Art and Design" in my category tab to see more:

I fussy cut the "Primeval Whirl" title from an actual photo that I took of the sign. I painted the smear across the page with Gelatos, and the "Awesome" was a cut file from the class. I know that every time I use Gelatos, I think of Wilna, and her videos for 2Peas, because I never would have discovered them if not for that.

A couple of embellishment close ups:


The "windows were also a cut file offered up in the class, and I had such fun scrapping once forgotten photos from my honeymoon, and filling the grid up with little bits of loveliness from a past counterfeit kit, such as these fun stamped and painted mixed media embellishments:


I love the tiny textured treasures on this page. The stamped cork and canvas really adds a fun bit of texture to the page!

Tuesday, April 9, 2013

I have Issues...Paper Issues...

I have been following paper Issues for quite awhile now, and I wanted to play along with some of their fun challenges ! So, I pulled out my March kit and got to work on their two most recent ones: "InstaLove" , and "Up In The Clouds". Now, I may be the last person in the world that doesn't have an Iphone or Droid, so I don't have an Instagram account (soon, I hope). But, my brother does, so I pulled an adorable picture of my nephew from my brother's Instagram to make this layout:
 The papers are Dear Lizzy 5th and Frolic, Dear Lizzy Lucky Charm, And The Maggie Holmes line for Crate Paper (a lot of which are available at the Paper Issues store-AND you can use the code ASHLEY75 to save 20%!). The ribbon and chipboard pieces are from Lucky Charm also, and, since the umbrella in the chipboard pack was a little too girly for my layout, I painted it with a lovely mint green, and I coated the chipboard raindrops with Glossy Accents to really give them a wet look. I sprinkled October Afternoon Sprinklers and Mr. Huey's mist across the layout on a diagonal, and added a few little drops of Glossy Accents across the layout to really carry out the rain effect-and I love how it came out! Isn't my nephew the cutest thing in this raincoat and boots?

Here is a closer look at the "rain":

 I was also inspired by last week's "Up In The Clouds" theme. When I saw the challenge, I immediately thought of this gorgeous Maggie Holmes cloud paper:


Now, I am not normally a big fan of cloud paper, but this one is just so gorgeous that I can't get enough of it! I love the aperture/bokeh effect that is applied to it-so, so pretty!

Here is my layout:
 I used a lot of Maggie Holmes paper, and a piece of the Dear Lizzy Lucky Charm yellow hearts paper. I loved that this black and cream chevron already had a misted look-I added a little more, because I had some new Primrose Heidi Swap Color Shine that I was dying to try, added some Thickers, Jillibean letter stickers, a doily that I die cut with a Papertrey Ink die from a scrap, some misted wood veneer butterflies, washi, Want 2 Scrap pink pearls, an Amy Tan camera stamped on a scrap of kraft, a chipboard star with a cut out center that I misted with Gold Lame Color Shine, and filled the center with gold Stickles. I added Glossy Accents for "lens" on the camera:

I used this fabulous sketch from Shimelle:

Thank you for stopping by today, I made some more layouts with my February and March kits, so I will be back to share more tomorrow!

Tuesday, February 26, 2013

Cupcakes On Fire

I am finally getting around to scrapping some photos from my twin daughters' 9th birthday party that was in November! I used papers and embellishments from January's Scrap Your Stash kit (the last page I shared was made from that kit, as well). I started with this sketch from Shimelle:
I was also inspired by a prompt from Janna Werner on 2Peas In The Mood To Scrap series-her mood board was full of arrows, and I loved the way she used them to point out her title and journaling, so I did the same:
I am also linking up with this week's Simon Says Stamp, as the challenge is to "Use an Arrow/Arrows"  I also took inspiration from Shimelle and wrote directly on my layout (I find myself doing it more and more lately):

Wednesday, January 30, 2013

Love, Elsie Blog Focus: Day 3

Good morning, everyone! Today's Tip for using Love, Elsie papers? Look for a theme that relates to your photos. My example:
I had this awesome Love, Elsie ladybug paper, which I felt accented my photos pretty well, and carried out my theme. To keep the layout looking current and fresh, I pulled out a bold red chevron paper from Basic Grey's PB&J collection, and used washi in my layering of embellishments on the corners. I used lettering stickers in a very curly font, because I felt it contrasted nicely with the chevron paper, while mimicking the flight of a ladybug. I scattered a few glittery star stickers across the page as well.

The embellishments:

I was kind of proud of myself for using some ancient Stickopotamus stickers in my embellishment clusters, as well...

So try this technique out on some of your older papers, as well! Love, Elsie has many papers that will work like this; travel themed for exploring/traveling pages, music note paper that would work well for concerts and musicals, school/notebook/doodle-y type papers that would go well with back to school,  school project and award photos, and so on. If you try out any of my ideas with your old stash-post pictures and link up in the comments! I would love to see!

And, don't forget to leave a comment on each post this week for a chance to win my giveaway:

Monday, January 28, 2013

"Love, Elsie" Blog Focus: Day 1

Elsie Flannigan (now Elsie Larson) took the scrapbooking world by storm with her doodled scrapbook papers, and for a few years, she had one of the most popular and talked about scrapbook collections around. As a result, many long-time scrapbookers filled their stash with papers and embellishments from Elsie's collections...and, unfortunately, a lot of these fun and beautiful papers just stayed there...in our stashes! Well, not anymore! I have made up my mind that I have paid for it, and I like it, so I am not going to purge it just because it is an older collection of papers! I am going to use it! And, hopefully, I will inspire many of you to use it as well, instead of allowing it to collect dust and guilt in our stash!  So, every day this week, I plan to share with you my own ideas and pages made with Elsie's fun papers, and give tips for using up any older stash that you may have!

The first way I would like to suggest for using Elsie's papers is; "Loud and Proud"!  Don't try to hide it or cover it, just use it! Here is my example:
 
I started with this paper; Love, Elsie Math Class:

This paper was such a fun doodle print that was perfect for the photo of my kiddos coloring! And I had a bit of fun myself coloring in the doodles (my kids noticed and asked my for a sheet of it to color, too!)...and I loved using lots of bright, happy colors on it. I added in scraps of some of my most colorful off-cuts for the layers, and embellished it with twine, washi tape, and a Love, Elsie chipboard button, and did the title with foam Thickers in the doodle-y style Custard font.

Here's a closer look at the button embellishment:
 
My advice for today: If you love it, use it! As scrapbookers that have new and beautiful papers and embellishments made available to us at least twice a year at CHA (and some companies do mid-season releases, as well), it is so easy to get caught up in needing the newest and greatest things. And there isn't any thing wrong with falling in love with a new and beautiful piece of paper or embellishment. But you don't have to feel like you have to have it to have beautiful pages! You can use that older stash, and make pages that are just as lovely and meaningful! Try it out, you just might find a new favorite out of your old stash!

Last but definitely not least... I love these goodies, and I know you will love them too! But you really can't buy them anymore, so I am giving some away for one of my lucky blog followers to play with! All you have to do is leave a comment on any of my Love, Elsie blog posts this week, follow my blog, and you will be entered in the drawing for this prize:
There are a fun selection of Love, Elsie papers for you to play with, a few sheets of cardstock in neutral colors, some chipboard houses from Jenni Bowlin, ribbon and washi, a little chipboard mini album, some die cut tags, die cut letters, and some flair badges!

If you would like to know what is up with Elsie now, check out her fun and very popular blog, A Beautiful Mess ...all about everyday life, fashion, crafts, DIY, photography and recipes

Thursday, January 17, 2013

More Journal Your Christmas Fun (Day 3)


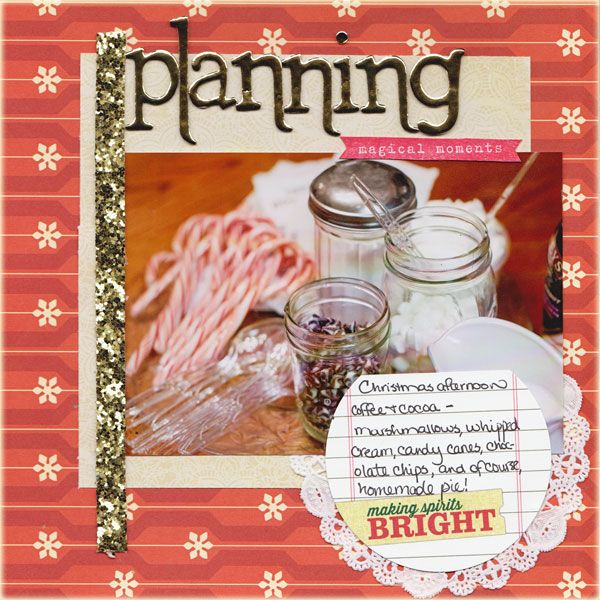
Two Peas in a Bucket has had a range of CHA challenges this week, so I used several of the challenges as inspiration for my Journal Your Christmas pages. Here is my page for JYC, Dec 3, "Planning Magical Moments":

This layout is done in response to CHA Challenge #2, "Scraplift 2 Concepts". I took inspiration from these sources:
http://www.twopeasinabucket.com/gallery/member/367453-tenmylove/1875576-december-daily-day-1-cover/ [twopeasinabucket.com]
and this one:
http://www.twopeasinabucket.com/gallery/member/498045-soaphousemama/1877620-days-3-and-4-december-daily-jyc/ [twopeasinabucket.com]

I also used my 2 kits that I made up for January from my stash:
Scrap Your Stash Kit , and May Your Days Be Merry and Bright Counterfeit Kit .

Supplies used: Cosmo Cricket Jolly Days background, cream colored pp is from Crate Paper, Wilton's Doily, Elle's Studio stamp and journaling spot, gold glitter ribbon and Thickers from American Crafts.

I quite like how it came out, and I have enjoyed playing along with the challenges at 2Peas, so I will be sharing many more pages over the next few days...Leave me a comment to let me know what you think!

Wednesday, October 31, 2012

Creative Scrappers sketch #230 (Indoor Smores)

One more quick post today with a page based on this sketch, and inspired by Shimelle's Scrapbook Remix, Prompt 5:
I flipped it on its side, and made this page:
 A closer look at those cute Cosmo Cricket S'more Love embellies:

I started with a Basic Grey Granola CS base, layered on Cosmo Cricket, from Jolly Days, S'more Love, and Garden Variety, and a brown houndstooth print from Making Memories, dripped on some Mr'Huey's Dark Calico, inked the edges of the CS with Walnut Stain Distress ink, and added a sprinkle of hearts from a brown chipboard Thicker sheet, some S'more Love chippies, a title that I stamped from the S'more Love stamp set and cut out/raised with a pop dot, and a S'more Love journaling spot that I attached with stitching and a Making Memories upholstery brad.

Tuesday, October 30, 2012

Happy Tuesday!

I have lots to share with you today, so I will get started! Up first, I have a layout that I made for this sketch from ScrapFriends:

Here is the layout that I made for the challenge:

A closer look at the fun details:


The supplies I used were taken from a page kit that I made for next month's CKCB hop, so you'll get to see the kit with a supply list in a few days.
The second layout that I am sharing today is made for the Simon Says Stamp Challenge this week, which is Fall Leaves:
I used another kit which you will see on November 6th for this page, along with some yummy Jenni Bowlin die-cuts that I won and just had to try out. The photos were taken on one of my daily walks at the beginning of fall.

The last page I am sharing today is one that I made for the Glitter Girl Challenge this week, "A Manly Model".
I also based it on sketch #78 from ScrapFit challenges:

 A closer look:

 Don't you love the gorgeous embossed quatrefoil cardstock? I used some new goodies that I won from the My Mind's Eye blog, from the Lost and Found 3: Ruby collection-the patterned papers are from the 6x6 pad (I just hid the seam under the layered border strip). I was excited at how well the Tin Pin from October Afternoon's Midway collection worked with the photo and theme-I have had this photo for 6 years, and just now was inspired to scrap it!!

Thursday, October 25, 2012

Mixing It Up

This week I have been very inspired by the new class I am taking over at Shimelle's website, Scrapbook Remix:

Here are my pages inspired by the first 3 days of prompts:
Day 1 "Use a monochromatic color palette":
Day 2 "Use the B-sides":

Day 3 (I was inspired by one of Shimelle's layouts in the prompt, so scraplifted it!):

 
All of these layouts were made from my October CKCB kit, with the exception of some scraps (and it's always good to use up some of those, right?)
 

Sunday, October 14, 2012

Inspired by Jen Gallacher

Earlier today, I saw a new video series, Seasonal Cards by Jen Gallacher, and I was inspired to make this card:
 
Supplies used: I cut out the file folder shape with my Cricut and SCAL, ribbon from WM, punched circle that I corrugated myself, stamped the inside with a Glitz Designs grid stamp, Tim Holtz journaling tag stamped with a stamp from Inkadinkado, paper scrap from Cloud9 Designs that I machine stitched, stickers from Heidi Grace, Thickers holly leaves, gems from the Paper Studio and K&Co.

Wednesday, October 10, 2012

Honeydukes Candy Shop *Inspired by Glitter Girl and October Afternoon

I used this week's sketch from October Afternoon:
Here is my layout:

Close-ups of the embellies:


(Buttons, rub-on candy machine that I inked, and a cut-out from the patterned paper)
 
 
(Stamped washi, stamped and inked candies, and Elle's Studio Tags)
 
 I was inspired to stamp on my layout by this week's Glitter Girl video! Stamps used are from TPC Studios, Inkdadinkado, and Hampton Art, using black Staz-on to stamp on the washi. I stamped the candy on a scrap of white cardstock, and inked over it with Old Paper Distress Ink. All of the papers, buttons, and rub-ons are from October Afternoon (mostly the 5&Dime collection), and tags are from Elle's Studios. The title is a cut out picture of the sign I made for my son's party, and I added Thickers to spell it out the rest of the way.

Saturday, October 6, 2012

October Counterfeit Kit

It's that time again! Time for the Master Forger's blog hop to reveal our kits! This month, we were inspired by the stunning September kit from Gossamer Blue Kit Club:
My itchy fingers really wanted to just buy it, but I have so much stash, I decided to see what I could pull together from that. Here is the kit I came up with:
 I have papers from My Minds Eye, Basic Grey, Echo Park, and Nikki Sivils. Embellishments
are from October Afternoon, American Crafts Thickers, Making Memories, Pretty Little Studio, Elle's Studio, and Prima (and of course  I had to put some washi tape in there!).
My Add-On Kit:

 
 More Thickers, October Afternoon, some vintage mailing labels for journaling, and some stamps.
I had my kit all together, and then Jessica Sprague put some of the Everyday Eclectic digitals on sale this past Wednesday, so I decided it was fate and added them into my kit:


I LOVE this collection, so I am sure I will get a lot of use out of the digi kit-my favorite part of digital scrapbook elements is the ability to print them over and over!

I already made one page with my kit, inspired by this week's Glitter Girl episode:
I used Tea Dye and Frayed Burlap Distress inks to really "muddy it up", and the background pp is the B-side of the Basic Grey blue floral print from my kit. I die cut the cameras and "Memories" word jumble with my Cricut, using the Graphically Speaking and Cricut Sampler Cartridges. I used the Martha Stewart Drippy Goo border punch, lots of digital papers and embellishments from my digital kits, a Tin Pin from the OA set, backed with a small scalloped circle punch by Martha Stewart, and the journaling spot is a piece of patterned cardstock from the 5&Dime pad that I trimmed down.
Close-ups of the page details:


Thanks for dropping by my blog today, now be sure to drop by the rest of the Master Forgers' blogs today for lots more kit inspiration!
*Edited to add: I posted this early on accident, the other girls won't be up until midnight tonight or tomorrow morning
Here is the list: